


Well six years ago a friend of mine convinced me to order the adjustable rig from the Ceramic Grilling Store. I was a little skeptic at first then I decided to order the adjustable rig for my Kamado Joe. It took less then a week for my order to arrive. (picture above obtained from there website)
Technical Specification obtained from there website: The Ceramic Grill Store
Large Adjustable Rig:
• The Adjustable Rig sits directly on the fire ring.
• Overall height is 6 inches.
• Four brackets support the crossbars and upper ring.
• The brackets are notched creating Levels at 1.5", 3.0" and 4.5" above the fire ring.
• A front portion of the top ring is cut away and lowered to Level 1.5, improving access to the firebox and inside the Rig.
• Opening between the front brackets is approximately 13-3/16" wide.
• Back support also acts as a stop for grids and such.
• Top and bottom ring diameters are 17.375" OD.
• Kamado Joe (with small hinge gate) or our 18" Stainless large grid sits atop the Rig creating a raised grid set-up.
• Our 16.5" Round or 13"x17" Oval Stainless grids fit inside the Rig.
• Our 13"x17" Oval Stainless Grid slides between the front brackets on the Slide Guide.
• The Rings and back support material is 1/4", 304 Stainless round bar.
• The four brackets are laser cut from 7ga. or 3/16" 304 Stainless Steel plate.
• After welding the Rig is passivated for improved durability.
• Made in the USA.
Large Rig Crossbar Specs
• Two Crossbars (one pair) come with the Rig.
• Crossbars sit in the notches that are laser cut in the Rig brackets. One Crossbar spans the front brackets and the other Crossbar spans back brackets.
• Crossbars positions are at Levels 1.5", 3.0" and 4.5" above the fire ring.
• Crossbars support ceramic stones, pans, grids and such inside the Rig.
• Material is 1/4", 304 Stainless round bar.
• Made in the USA.
Large Adjustable Rig Accessories
• Rig Extender sits atop the Rig and raises the top cooking platform from 6" to 7.5" above the fire ring.
• Large Slide Guide is a rail system to slide the 13"x17" Oval Stainless Grid or Stone in and out of the Rig.
• 13"x17 Oval Stainless Grid fits inside the Rig and can slide between the Rig's front brackets.
• 16.5" Round Stainless Grid fits inside the Rig or atop the Rig Extender for single or multi-grid cooks.
• 9"x18" Half Stainless Grid sits atop the backside of the Rig for 1-1/2" grid set-ups.
• 13" & 16" Round, 13"x17" Oval and 8"x16" Half Ceramic Stones sit on the Rig Crossbars as indirect set-ups.
• 13.5", 14" and 16" Round Stainless Drip Pans fit the Rig.
• Large Spider is used for big two grid low and slow, barbeque, cooks.
• Accessories are made in the USA.
Descrition of the pieces of the adjustable rig:
(this info is straigh from there website)
"Platform: The large Adjustable Rig with Pair of Crossbars is the base platform for your cooks. The Rig sits on the fire ring. Use the Crossbars to set stones, pans, grids and such 1.5", 3.0" and 4.5" above the fire ring. The Rig positions the large 18" stock grid 6" above the fire ring.
Spider: The Large Spider sits down in the fire ring and provides a shelf to wok, sear or blacken closer to the Lump. Use the Spider to hold the 13" Round Ceramic Stone and 13.5" Round Stainless Drip Pan for big two grid cooks on the Rig. Flip the Large Spider up for a shelf above the fire ring. Big Green Egg's small cast iron grid (model #13CI) is recommended for searing on the Spider.
Indirect Piece: Use the 13" Round Ceramic Stone as a heat deflector for indirect set-ups on the Large Spider or Adjustable Rig. The Stone is round like the cooker so it encourages uniform air circulation. We recommend setting the Stone on the Rig whenever possible for easy access to the lump. The 13" Stone matches up with Big Green Egg's platesetter so it's a good fit for baking pizzas on the platesetter, or atop the Adjustable Rig or Rig Extender.
Drip Pan: The 13.5” Stainless Drip Pan is sized to fit inside the fire ring for two grid or low & slow cooks on the Rig. Use it on the Rig for one grid low and slow cooks. Add the 16" Stainless Drip Pan if you plan to do big low and slow cooks. Foil the pan(s) for easy clean up. We recommend using the 13" or 13"x17" Oval Stone under the Stainless Pans.
Cooking Grid: You have the option, 16.5" Round or 13"x17" Oval Stainless Grid"
When I received the adjustable rig I was extremely impress in the quality and craftsmanship that you went in the design of the rig. It brings your cooking to the next level on the Kamado Joe.


You can cook indirect and direct with it and you can also use a wok for cooking stir-fry's by installing the spider and placing the wok on top of the spider.


The cooking grill is adjustable with heights of 1.5”, 3.0” or 4.5” (felt line) above the fire ring. (picture bellow obtain from there website)

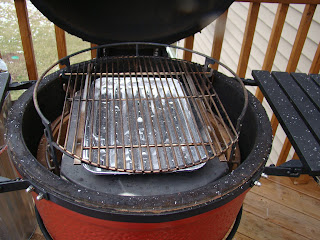


Slid-able rack


You have the option between two grid for using inside the Rig: 16.5” Round or 13”x17" Oval Stainless Grids. Both the 16.5" Round and 13”x17” Oval Grids are fabricated with 304 Stainless and have an Electro-polish finish for improved surface performance. (pictures obtained from there website)
This adjustable rig is perfect for cooking ribs, wings, pull pork, etc..... The other big advantage of using the rig is for multi-layer cooking! (pictures obtained from there website)


With the use of the spider and pizza stone it automatically turns your set up for indirect cooking!


Wen cooking above the felt line (gasket) it has a wide enough gap for adding wood chunks or chips for smoking which is pretty handy!! (picture obtained from there website)

I have been using the adjustable rig for pretty much every cook I do on my Kamado Joe until I was introduced to the Divide and Conquer system. This accessory is definitely a good to have for serious backyard cooking but the Divide and Conquer system is much more innovative, versatile and easy to use. By getting the adjustable rig combo you get some bang for your buck and its more versatile then just using the heat deflector and pizza stone on the Joe. Its well built and I consider this one entry level in this type of rack system. I would definitely rate this system a 3.5 star out of 5. Its not official Kamado Joe accessory but its a nice one to have if you don't have access to the Divide and Conquer system. Lots of my reader where asking questions on it so I decided to included it here. Which you can use to compare both system and decide from there which one fits your needs better.

You can get the adjustable rigs from: The Ceramic Grill Store
The adjustable rigs retails for $150.00 plus shipping.


